Hydrometer Analysis with Humboldt Solutions
- August 26th, 2020
- Category: Equipment Guides
What is a Hydrometer?
Hydrometers are used to measure the relative density of a liquid. They are primarily made of glass and have two parts: the hydrometer with a mercury weighted bulb at the bottom and a cylinder with graduation marks. The science behind the hydrometer is simple – the lower the density of the liquid, the more the hydrometer will sink.
Why is a Hydrometer used for grain size analysis of soil?
Sieve analysis is used for soil analysis; however, it becomes inaccurate with grain sizes around 0.075 mm (No. 200 sieve). The risk of losing samples becomes high and it is not practical to design sieves any smaller. Hydrometer soil analysis is used in conjunction with standard sieve analysis of fine-grained soils to provide a complete gradation curve or gradation profile.
Hydrometer Analysis Theory
Hydrometer soil analysis is based on Stokes Law, which claims that the velocity at which a particle settles while suspended, all other factors being equal, is determined by the shape, weight and size of the particle. Because it is assumed that soil particles have the same specific gravity, it’s expected that larger particles will settle more quickly than finer ones in a soil-water suspension. Hydrometers are able to measure a soil’s particle-size distribution by measuring suspended solids in sedimentation cylinders.
Sample Preparation
Dry sieving is used first to remove larger particles before the distribution of particles smaller than 0.075mm can be determined using a hydrometer.
Moist Preparation
This is the preferred method as it maintains soil moisture properties during the preparation process. Here the sample is moved through a 2.0mm (No. 10) sieve with a rubber scrapper. The moisture within the sample is maintained, or increased as required.
Air-dried Preparation
This method is only allowable if the sample arrives in “air-dry condition”. Clumps of soil may be broken up using a mortar with a rubber-tipped pestle. The soil is then passed through a 2.0mm (No. 10) sieve.
Calculating the Mass Required for the Sedimentation Specimen
After working your sample through the sieve, it is time to calculate the mass of your sample that will be required for hydrometer testing. This calculation is based on the moisture content of the sample, the sediment capacity of your hydrometer and the estimated percentage of your sample that passes through the 0.075mm (No. 200) sieve.

where:
Mmest = estimated moist mass, nearest 1g,
Hc = hydrometer capacity, g
%est = estimated percentage of material passing the 0.075mm (No. 200) sieve to the nearest 1%
Wcest = estimated water content to the nearest 1%
In most instances you should expect to calculate between 50 – 60 g of material finer than the 2.00 mm (No. 10) sieve for use in the hydrometer test.
Suspending your Soil Sample
Sodium hexametaphosphate is a dispersion agent that will keep your sample from clumping together. This dispersion agent should be added to distilled water to create a dispersion solution. The amount of dispersing agent required depends on your soil type. Once you have prepared your dispersion solution, place your sample into a 250ml glass beaker and add your dispersion solution. Rinse your specimen slurry into a dispersion cup with stirring apparatus and mix for one minute. After stirring, add to a 1000ml Sedimentation Cylinder and carefully add water, filling the cylinder to the 1,000ml mark. You may mix the solution with the water by manually inverting (the “tipping method”), however using a soil agitator is preferred. Cover your cylinder and leave it overnight so that the solution will equilibrate. This can be done both at room temperature or in a constant temperature water bath.
Hydrometer Test Protocol
- To start the test, the suspension must be mixed again (using either the tipping method or the agitator). Use a timer to track the amount of time it takes to mix the solution.
- Once mixing is complete, place the cylinder on the work bench (if testing in an environment where room temperature will be maintained) or into the constant temperature bath. If foam has formed during mixing that will interfere with hydrometer readings, 3-5 drops of isopropyl alcohol may be added to reduce the foam.
- Using your timer, note readings at the 1 min, 2 mins, 4 mins, 15 mins, 30 mins, 60 mins, 240 mins and 1440 mins marks.
- To take these readings, the hydrometer must be lowered into the suspension 20 seconds prior to the reading. Maneuver the hydrometer to the level where the reading will take place and allow for hydrometer stabilization.
- The reading should take place at the top of the meniscus and rounded to the nearest 1/4 graduation.
- Hydrometer extraction should be done in one fluid motion over 5 to 10 secs. Should there be a drop of fluid on the bulb end, carefully touch the hydrometer end to the sedimentation cylinder so that the drip can rejoin the suspension.
- The hydrometer should then be placed into a cylinder of clean water and gently spun to clean.
- Be sure to remove and dry the hydrometer before taking additional readings.
- Following each hydrometer measurement, temperature of the solution should me measured. It is important to use a thermometer that has been standardized and has an accuracy and readability of at least ±0.5°C when immersed at depths from 25 to 80 mm.
- To record the temperature, gently insert the thermometer without disturbing the suspension.
- Temperature readings are valid for 30 mins and do not need to be repeated within that time.
- After all measurements have been taken, the suspension is transferred to an oven drying container.
- When drying is complete, weigh the remaining solids to determine the total dry mass. The specimen is then soaked in water and washed over 0.075mm (No. 200) sieve.
- Weigh and record the materials retained with the 0.075mm sieve.
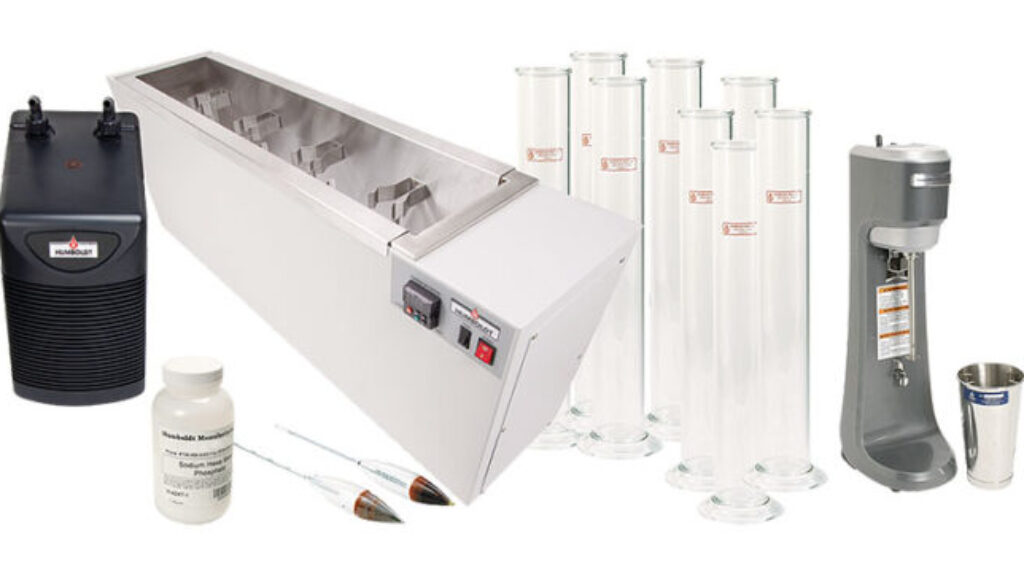
Why do you need Humboldt’s Hydrometer testing?
Constant temperature is important for accurate test results. The hydrometer constant temperature bath developed by Humboldt provides both heating and cooling to guarantee your samples stay at the desired temperature, regardless of the environment in which you are working.
The materials required for this procedure include soil hydrometers, hydrometer jar baths, constant-temperature water baths, soil dispersion mixers and sodium hexametaphosphate. All these items are available from Humboldt, either as sets or individual items to meet your needs.
We provide:
Hydrometer Analysis Set – Complete kit with all you need to determine the distribution of soil particles smaller than 75μm
Hydrometer Jar Bath – Unit is designed to hold eight Hydrometer Jars in a constant-temperature bath, which includes both heating and cooling
Soil Hydrometers – Measure the distribution of soil particle sizes by analyzing suspended solids in sedimentation cylinders
Hydrometer Jar – Graduated cylinders used to suspend solids for evaluation
Soil Dispersion Mixer – Method for dispersing soil suspensions for hydrometer analysis using high-speed mixing
Air Jet Dispersion Tube – Provides a method to disperse soil suspensions directly in the Hydrometer Jar
Dispersion Hand Stirrer – A handheld way to break up soil suspensions directly in the Hydrometer Jar
Humboldt’s experts are available to answer any questions you may have. Please see our support page or call 1.800.544.7220 to speak with a representative.